Tuesday, July 29, 2014

Boxwork, Popcorn and Animal Crackers in America's Little-Known Jewel: The Wind Cave

              After our trip to Mt. Rushmore, we drove about 30 mins to an hour down to the Wind Cave National Park. I first came across the Wind Cave in a National Parks book a friend had shown me (thanks Veronica!). What made it so interesting was not only the immense size of this cave (6th longest cave in the world measuring 140 KNOWN miles of passageway with about 4 miles being discovered yearly) but also the rock formations caused by erosion. The cave gets its name from the strong air currents that blow in and out of it, almost as if it's breathing. And for some Native American tribes the cave is a sacred place that plays a part in our creation.

             You can go on a few different types of tours through the Wind Cave for around $12 a person. We went on the Natural Entrance Cave tour which lasts about 1 hour and 15 minutes with around 300 stairs going mostly downward. Be prepared to squinch up or duck your head in some of the very narrow passageways.

             The celebrity of this cave is the boxwork. Boxwork is an uncommon mineral structure and the Wind Cave boasts 95% of the world's known boxwork structures. It's made up of thin blades of calcite that project from the wall. The spaces in between the calcite veins used to be full of rock that dissolved away over time leaving the "honeycomb" pattern.


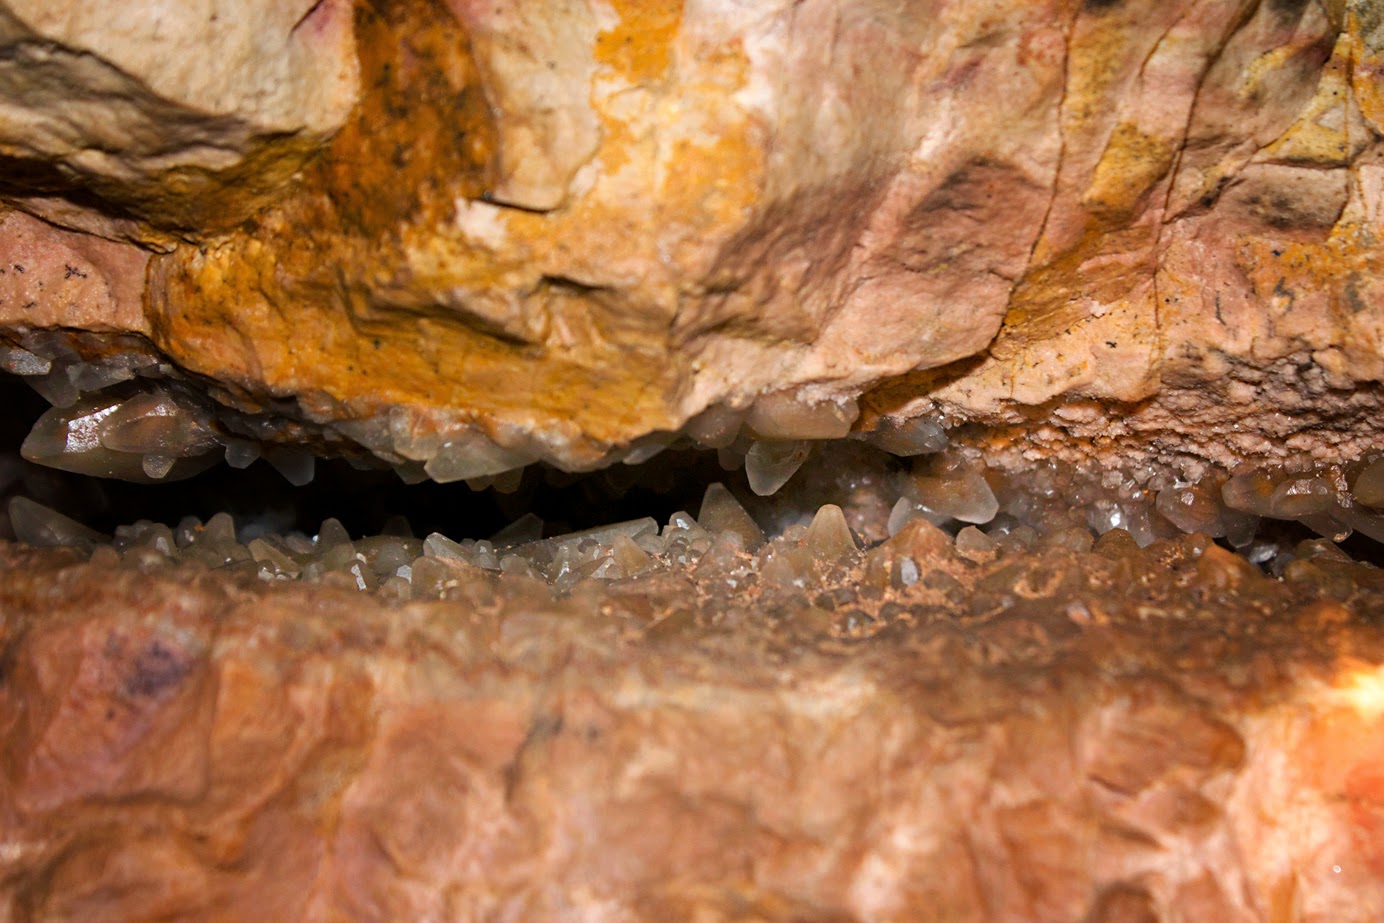
This was a really cool crevice where crystals jutted out of the rock, almost looks like an alligator smiling :)


Along parts of the cave ceiling were formations sometimes referred to as "animal crackers" because of their shape:


In other areas are small knobby growths of calcite called "popcorn" :


Unfortunately, we didn't see any frostwork, but the tour was a treat and our guide was really enjoyable. 


Next time we're in the South Dakota area, we'd like to try one of the Candlelight Cave tours where you go down to an unlighted part of the cave carrying a bucket with a candle in it. If you want to find out more about this awesome and little-known place go to the official website here: Wind Cave National Park.


Friday, July 25, 2014

Mt. Rushmore in lovely South Dakota

         Back from vacation with lots of photos! This year we made it a 3-part trip with a stop at Mt. Rushmore, a tour through the Wind Cave and then camping in the Rocky Mountain National Park. The trip lasted 2 weeks with about half of it in the car, but we saw a lot of beautiful scenery along the way.
        After a 2-day drive, we stopped near Keystone, South Dakota where we stayed at the Happy Holiday Inn. Usually the places we stay in are pretty run of the mill mediocre, but we lucked out at this one. It was a small motel with charm and the innkeeper sent us to a local restaurant just down the street called, Shipwreck Lee's. If you ever find yourself in the area make a point to stop there! They have great food and friendly service. You can also find them on Facebook: Shipwreck Lee's Neighborhood Bar & Grill. There's also a lot of really quaint shops in Keystone. We stopped at the Black Hills Glass Blowers where you can watch artist, Peter Hopkins, at work. If you're looking for a nice souvenir that's a bit different then their studio is worth the stop (and right near Mt. Rushmore) Black Hills Glass Blowers.

         Once we got to Mt. Rushmore (the sun was out, thank goodness!) we stopped at the main balcony where you get a really great view of the faces. I didn't realize though that you can also get a bit closer to the mountain by walking the Presidential Trail. It's about a 1/2 mile and is mainly short staircases that give you different viewpoints of Mt. Rushmore. Here's a photo when you're walking through the entrance under the flags:


The next two photos were taken near the beginning of the Presidential Trail:


Near stop 16 on the Presidential Trail there's a really cool rock formation you can walk into where George Washington can be viewed clearly through the crevice:


Abraham Lincoln at stop 17:


You get a nice & close look at them at stop 18:


I'm really glad we were able to check this off our bucket list and it was a great afternoon. The area we drove through beforehand was one of those areas you wouldn't mind living in. Not to mention you'd have Reptile World right down the street :)


Wednesday, May 22, 2013

Creating a Certificate of Authenticity for Your Artwork

       Well, I'm closing the gap on finishing my certificates of authenticity. It feels like it will never end! I've printed out about 60 so far. It's recommended to create a CoA if you have original artwork or limited edition prints for sale. It's icing on the cake for art collectors and it sends the message that you're serious about your work. I don't have any limited edition prints right now so I just created CoAs for my original paintings.

       In my online research, I came across an especially helpful site that helped guide me in creating my own CoA. You can visit that site here: How to Create a Certificate of Authenticity.

       Basic breakdown of my Certificate of Authenticity:
               1. Jeffcoat Art header
               2. Copyright disclaimer
               3. Artist
               4. Title
               5. Size
               6. Date
               7. Location
               8. Edition
               9. Medium
              10. Materials
              11. Catalog #
              12. Artist signature & date
              13. Contact info

        It's also a good idea to make your CoA stand apart from others. I decided to paint my painter's mark on the certificate in black acrylic paint.

         While you're coming up with your own unique CoA, it's helpful to start cataloging your work if you haven't already. One site that made that process a lot less painful was: How to Make a Catalog of Artwork. The artist who wrote the article also provides their own personal templates. I utilized two of these: a Catalog Page that is filled out and printed for EACH piece of artwork and then an Inventory Page listing all titles and catalog #s of your work so you have a quick reference sheet you can check when you need it.

        If you're like me and didn't bother cataloging your artwork until years after creating a lot of pieces then what you'll want to do first is make a rough list of everything you've made. Next to the title of each piece write the year it was done in along with an assigned catalog #. I tried to put my work in chronological order and numbered the oldest piece "#1", and so forth and so on. It can be a bit daunting, but you'll quickly pick up a good pace.

        After I created this "master list," I worked on one piece of art at a time. For each painting, I printed and filled out a Catalog Page and slipped it into a plastic sheet protector along with an image of the painting. I also keep my reference photos and just tuck them into the sheet protector as well. Then I printed the CoA, signed and dated it then painted my painter's mark at the bottom. If my work was on stretched canvas then I kept the CoA in the sheet protector. If it was on a flat canvas sheet then I would include the CoA with the original (protected by a sealed plastic flap seal bag that can be purchased at www.clearbags.com).

       For the paintings that have sold, I plan on mailing or giving them to the person who commissioned the painting. Even though it's after the fact, it reminds clients of the work you've done for them and may even bring back an old customer.
 
        I hope all of this was helpful! Trying to create and sell AND BE ORGANIZED can get overwhelming to the point that it feels impossible. If you are able to use any of this information, I would love to hear how your experience creating your own certificate of authenticity was and I would love even more to see your artwork. Good luck!


Wednesday, April 10, 2013

Layne Staley Portrait- Alice in Chains

 I painted Layne Staley from Alice in Chains in 2007. The original painting was a Christmas gift for my partner, Karl. He's the one who got me hooked on their music! Up until then, I had only heard a couple of the songs that got a lot of radio play, but their work is a lot more varied than those few songs. They have an amazing gift for layering sound. Whether it's vocals or instruments, you hear something new everytime you listen to one of their songs. Unfortunately, they lost a great talent when Layne Staley died. Here's a bit about his life...

  Born August 22, 1967 in Kirkland, Washington, Layne Staley had early aspirations of becoming a singer. By 1987, Staley joined forces with Jerry Cantrell, Sean Kinney and Mike Starr and formed Alice in Chains, a band that would become internationally famous in the grunge movement. The name of the band actually came from a previous band Staley was in called Alice N' Chains where Staley would dress in drag and play speed metal. 

In 1990, they released their debut album titled Facelift, featuring the hit song, "Man in the Box." They went on to release several more albums and, in 1996, performed on MTV Unplugged. This would be Staley's last performance.

On April 20, 2002, Layne Staley's body was found in his condo surrounded by spray paint cans, a small stash of cocaine and two crack pipes. A memorial was held that night with about 1,000 friends and fans attending. His autopsy would later report that he had died from a combination of heroin and cocaine referred to as a "speedball."

Bands such as Pearl Jam, Cold, Staind and others have written songs in honor of Staley's memory and the music he created. His mother has gone on to form the Layne Staley fund that works to raise money for drug treatment in Seattle.


   I have been lucky enough to see Alice in Chains in concert, but I would have loved to see Layne Staley on stage. The band now has William DuVall as their lead singer and he doesn't disappoint.

*To read more about the Layne Staley fund visit their website: Layne Staley Fund

*To learn more about what Alice in Chains is currently doing (New album May 2013!) visit their website: Alice in Chains Official website

If you would like to purchase one of my Layne Staley prints, you can visit my Etsy store at the links below...


Layne Staley coffee mugs- CURRENTLY SOLD OUT- If you would like to order a mug just contact me.

Tuesday, February 26, 2013

New Baby Bump Painting

Here's a brand new addition to the commissions you can find at Jeffcoat Art! If you are a soon-to-be-mommy or know someone who is expecting then my Baby Bump paintings would make the perfect gift. It's sweet, simple and affordable. Here's the process:

1. Take a photo of the mommy-to-be standing in front of a window. Make sure to NOT use the flash. What you want is to create a silhouette photo of the subject with light coming in behind her. Of course, you want to take a profile shot of her so that you can see the baby bump. Then you want to take a photo of her in the exact same position but WITH the flash. This is in case I need any extra detail of the subject. Here are the photos I took of my sister, Sasha:


If there are any issues with taking the "silhouette photo" then just send me one where you've used the flash (see photo on right). Once you've emailed me your photo then the first stage of painting will look like this:


After I've painted a basic sketch of the subject it's time to fill in the background with white:


Fine tuning is next. Most of the subject is blacked out with some minor white highlights left in on the arm. Then I outline the subject in black again to make the subject sharper against the white background:


From there, I make sure everything is clean lines. An additional layer of white is painted around the mother-to-be to create a slight gradation in the background. And here is the finished product!


I am only charging $75 for the Baby Bump paintings. That's half of what I usually charge for a regular portrait. This is a great way to capture that special moment in time between a mother and her child. If you are interested in commissioning your own just email me your "silhouette photo" and "photo with flash" at jeffcoat4747@yahoo.com. To commission/purchase a Baby Bump painting please visit my Etsy shop: Commission a Baby Bump Painting. I gave this particular painting to my sister at her baby shower and it was a hit!